


- AllProduct Category
-
Dust Collector (Explosion Proof)
Atmospheric Sampler (Explosion-Proof)
Sanitary Equipment


详情描述
I. Product Introduction:
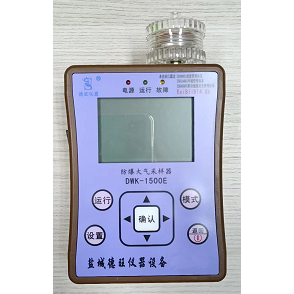
This sampler is a防爆 dual-gas-route atmospheric sampler launched by our company. Equipped with a microcomputer constant current system, an LCD digital display system, menu settings, and AC/DC compatibility, it utilizes a single-chip microcomputer as its intelligent control central processing unit for enhanced applicability. It comes with a standard 4400mAh lithium battery to meet long-duration sampling requirements. It is a practical dual-route explosion-proof atmospheric sampler suitable for occupational health, environmental protection, industrial and mining enterprises, and universities for atmospheric detection.
This sampler conforms to the MT162-95 "General Technical Conditions for Dust Samplers in Workplace," the Q/YCTY02-2008 Enterprise Standard for Atmospheric Samplers, and the GB3836.4-2010 standard's ExibⅡAT3GB level (intrinsically safe) explosion-proof design. It is suitable for factories, mines, and other workplaces with explosive gas hazards. It features low pulsation in sampled gas, high load capacity, stable flow rate, simple operation, safety and reliability, and ease of portability.
II. Product Features:
Sampling time can be set at any interval between 1 minute and 99 hours 59 minutes.
2. Features a large LCD display, intelligent management system, menu settings, records the last sampling time, continuous and intermittent sampling capabilities, smart power management, real-time battery display, and charging indicator.
3. Utilizes high-performance, non-memory lithium-ion batteries; no need to discharge before charging
4. The lithium battery pack of the sampler is equipped with a dedicated short-circuit current limiting protection device, ensuring the sampler operates within a safe current range, thereby enhancing its safety performance.
5. When the battery voltage drops below 6V, (please charge promptly) the sampler automatically activates self-protection to prevent battery over-discharge from affecting the battery's lifespan.
III. Principle of Operation
IV. Technical Parameters and Working Conditions:
Flow Range: 0.1~1L/min, 0.1~1.5L/min, 0.1-3L/min, 1-5L/min, 20-500ml/min (optional)
2. Flow Error: ≤ ±5%
3. Timing Error: ≤±1%o
4. Maximum Negative Pressure: ≥ 35,000 Pa
5. Charging Current: 1000mA (Standard Model)
6. Sampling Time: ≥240 min
7. Operating Temperature: -10 to 40℃
8. Noise: ≤60dB
9. Relative Humidity: ≤85%
Weight: 1.6 kg
11. Dimensions: 210x150x90mm
V. Usage and Maintenance:
1. Sampling: After securing the absorbent bottle with the absorbent solution (or an activated carbon sampling tube), turn on the "switch" key, enter the startup screen, and set the sampling time (use the left and right buttons to adjust the time setting position, and the plus/minus buttons to adjust the sampling time). Once the sampling time is set, press the "confirm" key to begin sampling. At this point, the internal power of the sampler is supplied to the motor through the control circuit, driving the air pump to draw air at a constant flow rate. Harmful gases in the air are then drawn into the absorbent solution of the absorbent bottle (or onto the activated carbon). Meanwhile, the timer set in advance starts the sampling countdown. After the set sampling time is reached, the instrument automatically shuts down, indicating the sampling is complete. The collected sample is then taken back to the lab for analysis.
During the sampling process, to pause sampling, simply press the "Confirm" button. Press "Confirm" again to resume sampling. To reset the sampling time, hold the "Cancel" button for 3 seconds, then you can set the sampling time again. The backlight will automatically turn off (enter power-saving mode) after about 5 seconds of inactivity. Once the menu settings are adjusted, upon next startup, just press the "Power On" button, select the desired time, and press "Confirm" to start sampling.
2. Charging: The instrument's display shows the battery capacity. This graphic indicates a full charge. When the graphic shows low voltage, it's time to charge. Simply connect the battery cable to the AC power and to the sampler to initiate automatic charging. Upon completion, the main unit's indicator light changes from red to green.
3. Important Notes: If not used for over 3 months, please recharge the battery to ensure its lifespan.
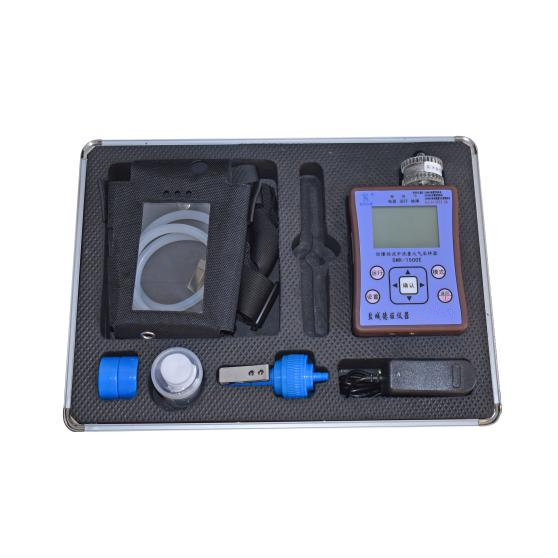
Section 6: Configuration List
Main Unit 1 unit
Instrument Case 1 piece
Safety Bottles 2 Pieces
Rubber Hoses 4 pcs
Absorbent Bottle Rack 1 pc
Set screw 2 pcs
Tripod 1 pc
Power Supply 1 pc
Manual 1 copy
Certificate of Compliance 1 copy
Warranty Card 1 Piece


