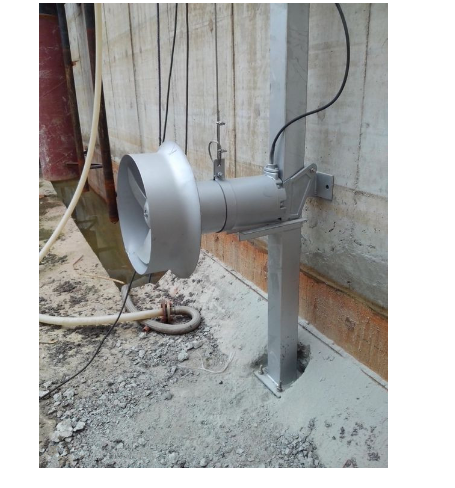
QJBO.85/8-260/3-740 Submersible Agitator Installation Instructions
QJB Submersible Mixing Pump Maintenance Instructions
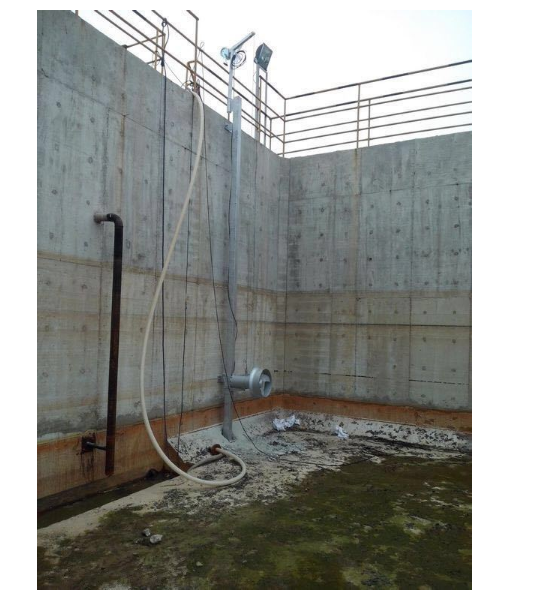
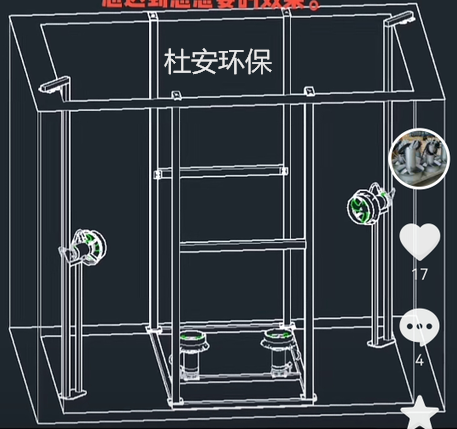
Installation Diagram of Submersible Mixer
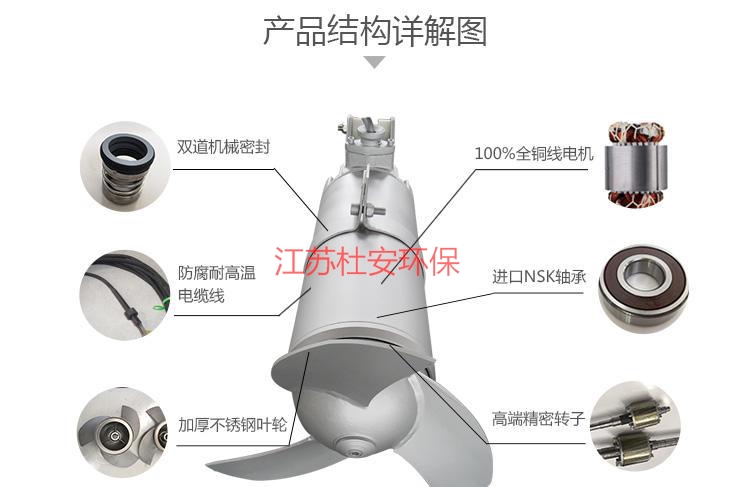
Duwan Environmental QJBO.85/8-260/3-740Main Components Material of Submersible Mixers:
Part Name | Material |
Mainframe | Stainless Steel 304 |
Propeller | Stainless Steel 304 |
Enhance Wire Rope | Stainless Steel 304 |
Guides, brackets, lifting devices | Stainless Steel 304 |
Hand-crank Hoist | Galvanized |
O-ring | Dacron-70 |
Mechanical Seal | Tungsten Carbide/Silicon Carbide |
The Du'an Environmental Protection Co., Ltd. in Jiangsu offers various installation methods for their QJB Submerged Mixers, primarily based on the installation system and dimensions. Common installation methods for submerged mixers are as follows:
Installation requirements for the submersible mixer are as follows:
Ensure easy disassembly of the mixer during maintenance.
The mixer's hoist chain should be able to be securely fastened at a specific location within the wellbore for future convenience.
Each mixer is installed within a fixed structure, and the mixer should be able to be lowered into position within the structure using a guiding device.
④ Assembly marks should be made on each component, and locating pins should be provided where necessary to ensure accurate reassembly and positioning on-site.
The mixer accessories and their cables should be capable of continuous operation submerged in 20 meters of water without damage, and should possess enhanced sealing reliability.
Installation Method 1: Primarily composed of guide rods, upper turntable, support blades, and lower turntable. The submersible mixer is connected to the guide rod via the lower turntable, suspended below the rod. The rod is then fixed to the upper support frame via the upper turntable. The submersible mixer can be installed at a certain angle between the vertical and horizontal planes by adjusting the position of the connecting bolts on the lower turntable. Additionally, the mixer can rotate 360° around the axis of the upper turntable by adjusting the bolt positions, to accommodate directional mixing or flow propulsion, eliminating dead zones in the pool, and ensuring optimal water flow.
Installation Method 2: Mainly consists of hand winches, lifting frames, straight lifting shackles, brackets, guide rods, intermediate support blades (not required for pool depths ≤ 6 meters), limit frames, and bases. The guide rod is fixed to the bracket, intermediate support frame, and base concentric axes via a hinge on the main body and can rotate ±60° within the horizontal plane to accommodate stirring or flow in different directions, eliminating dead zones in the pool and maintaining optimal water flow. The submersible mixer moves up and down the guide rod via guide wheels. The lifting frame can be mounted on the bracket and rotates 360° around its positioning axis for easy installation and maintenance. To enhance the reliability of the submersible mixer during operation and reduce vibration, the limit frame is typically welded directly to the guide rod and equipped with shock-absorbing pads between the mixer and the limit frame. The limit frame can be pre-welded to the guide rod before shipment or焊接 during on-site installation. Unless the customer has specific requirements, the limit frame is usually pre-welded before shipment.
Diving AgitatorThe diving depth can be adjusted vertically as needed. The connection between the bracket base, support frame, and lower support bracket to the pool is fixed with expansion bolts, eliminating the need for pre-drilled holes. When placing an order, please provide the pool depth H so we can determine the size of the guide rod and the number of support frames. The material used for the installation system is made of stainless steel (or carbon steel). The lifting device, excluding the bracket base, can be shared by several mixers.
Installation Precautions for Submersible Mixers:
The guide rod should be perpendicular to the horizontal plane and can be corrected using a plumb bob.
During the lifting of the submerged mixer, the impeller end should be inclined upwards by 5° relative to the horizontal plane.
The lifting center of the crane and the submersible mixer are aligned on the same vertical axis.
The installation system for submersible mixers allows for quick assembly and disassembly without the need to drain the pool water. It is recommended to use Installation System I when the pool depth is H<4 meters.
Submersible mixers can be adjusted vertically to the desired depth and can rotate ±60° around the guide rod within the horizontal plane. The base, support frame, and lower bracket of the hoisting system are all fixed with expansion bolts to the connecting surfaces of the pool, without the need for pre-drilled holes. When the pool depth H > 4 meters, it is recommended to use System II, which requires a concrete foundation (or steel structure base) to be constructed at the bottom of the pool.
Submersible Agitator Maintenance and Care
Regularly replace lubricating oil, with a general cycle of six months.
Be particularly attentive to the equipment's sealing when disassembling the machine.
3. Regularly replace bearings.
If the fuel tank becomes blocked, it must be addressed promptly.
In the event of a water seal failure in a submerged agitator, it is essential to replace the seal promptly. Specific steps can be referred to as follows.
Remove the agitator from the engine.
Remove the nut at the front end of the stirrer shaft, take off the cover of the stirrer, and push out the impeller and the water seal.
3. Inspect the water seal. If it is made of rubberwood and the wear is not severe, you can place sandpaper on glass or dry wood to flatten or flip the water seal for use. For a thrust rubber seal, if there is damage, swelling, deformation, insufficient spring pressure, or breakage, all parts should be replaced with new ones.
Step 4: Install water seals and lock rings, etc.
Reinstall the belt pulley and the agitator cover, and tighten the fixing nuts.
6. Mixer Assembly Inspection: After reassembling the mixer, turn the belt wheel by hand; the mixer shaft should not have any jamming, and there should be no impact sounds between the impeller and the mixer housing.
Step 7: Reinstall the mixer onto the engine and secure the hoses and other fittings.
8. Inspection of the mixer's operation: After reassembly, add cooling water, start the engine, and after 5 minutes of operation, the submersible mixer should have no impact sounds or leakage for it to be considered in good working condition.